How to select, copy, and paste text on iPhone or iPad

Spelling mistakes, missing words, auto-correct malfunctions, and even using the wrong words can really screw up your communication. No one expects you to be perfect the first time you do anything, including typing a sentence. Apple has made it super easy to edit any text you have typed, which means you shouldn't have to stress too much when it comes to typing anything on your phone. Whether it's text messages to friends or important thoughts in the Notes app, editing can be done with ease, and multiple different ways.
How to use spelling correction iPhone and iPad
Simple spelling mistakes are very quick to find and fix. Whenever you spell something wrong you will notice a red-dotted line will appear below the misspelled word and you can fix them with just a few simple taps.
Tap on the misspelled word. It will have a red-dotted line underneath it.
Tap on the correct spelling of the word that appears above.

Note: If there is no suggested spelling to replace the misspelled word it means the word is misspelled so badly that it can't identify what the correct spelling should be. Demoralizing, perhaps, but it happens to everyone. If that is the case try retyping the word a little differently and try again.
How to use auto-correct on iPhone and iPad
The auto-correction feature can be a little tricky. The point of auto-correct is to be able to fix spelling mistakes as they come up rather than after you have typed everything out. Sounds like a dream come true, right?
- Start typing words.
- As you spell something wrong, the correct spelling will appear next to the word. If you are using Predictive Text, it will appear above the keyboard.
- Tap on the spacebar and just keep typing.

Auto-correct will just automatically swap the words out.
How to undo auto-correct when Predictive Text is disabled on iPhone and iPad
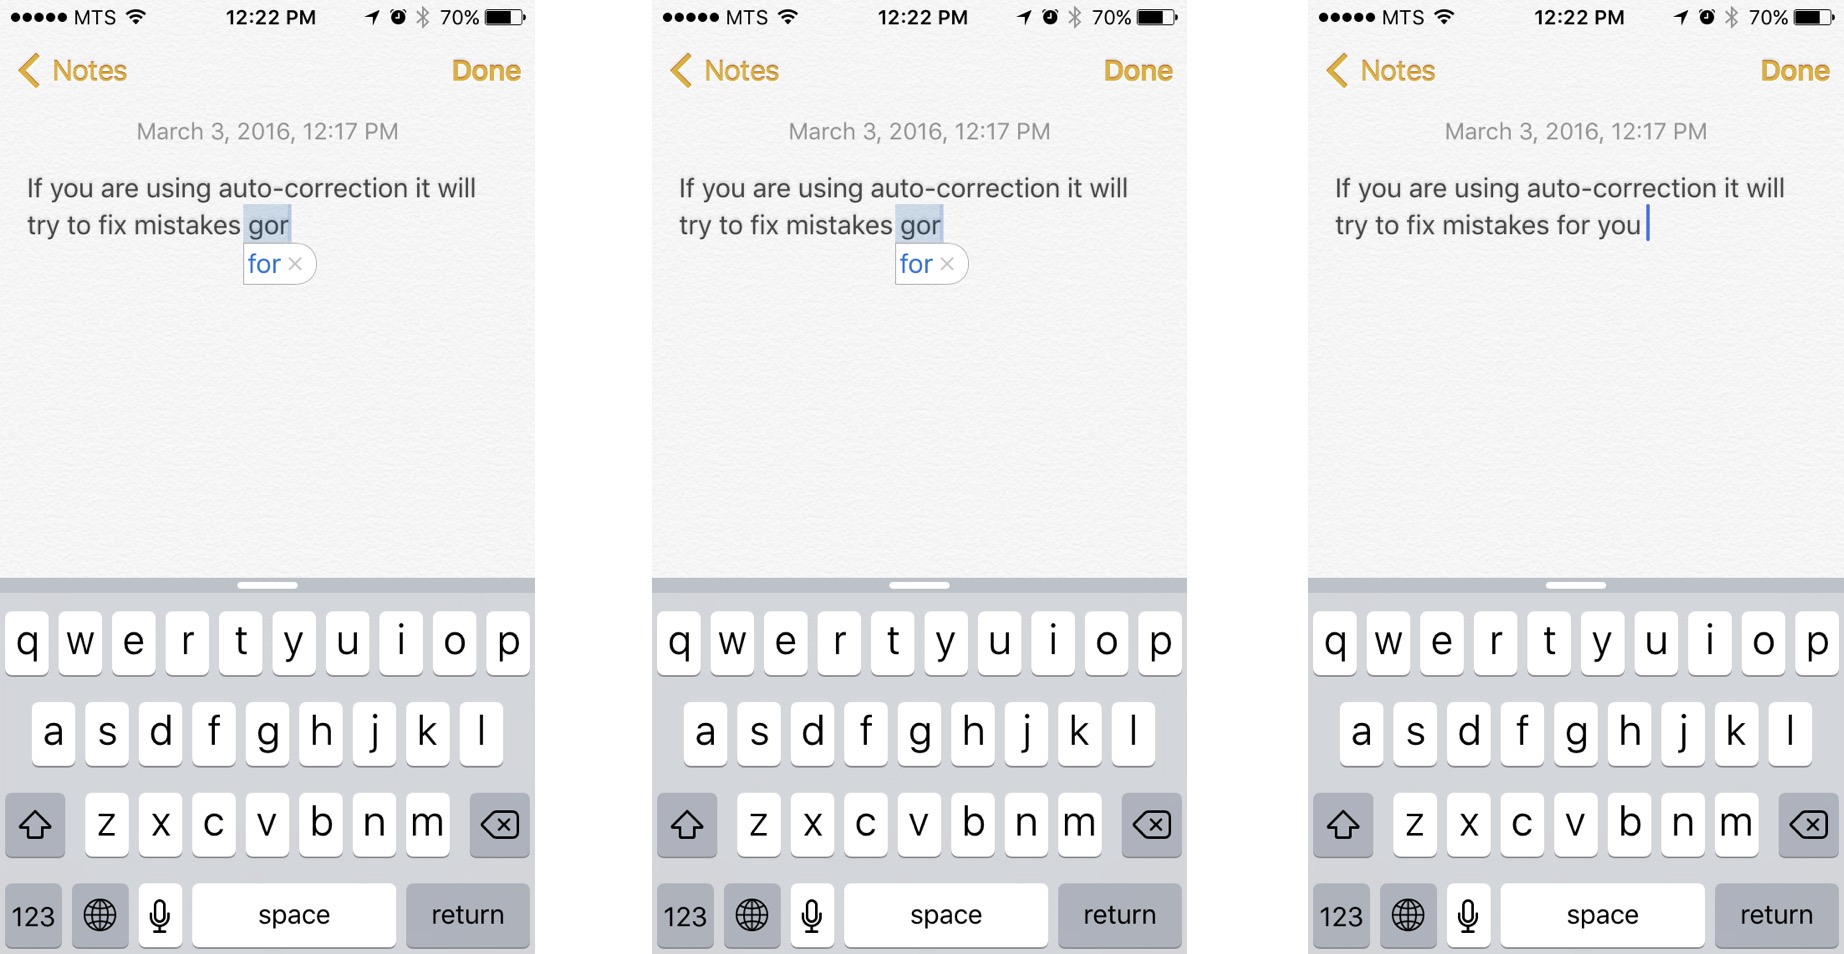
The auto-correct feature is a ruthless robot and won't recognize the difference between slang and a misspelled word. You can always override the auto-correct feature in instances where you want to keep the word you typed. Here's how to undo auto-correct when Predictive Text is disabled.
- Start typing words.
- As you spell something wrong, auto-correct will show you the word it will replace it with.
- Tap on the auto-corrected word to dismiss auto-correct feature.
- Keep on typing.
Important note: The auto-correct feature will actually learn from you if you stop it from correcting you a couple times on the same word. So if you use a slang word often it should only take a few times of telling auto-correct to leave it alone before it will stop correcting that word for you.
How to undo auto-correct on when Predictive Text is enabled on iPhone and iPad
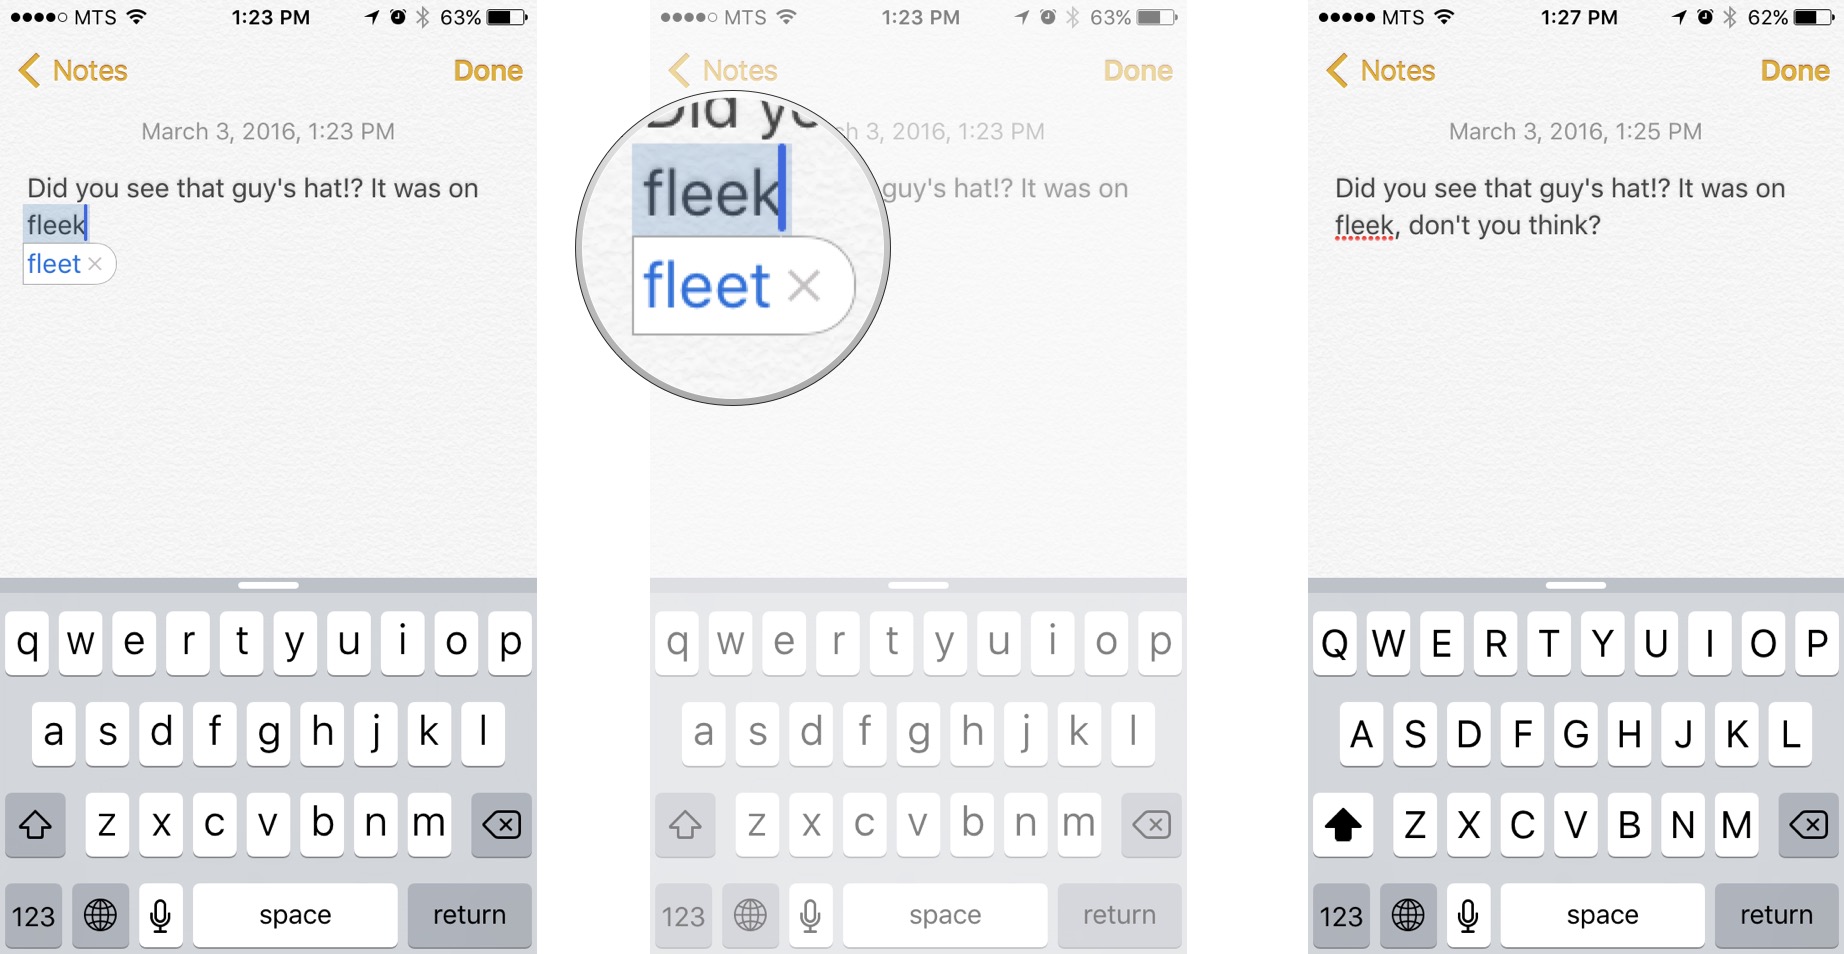
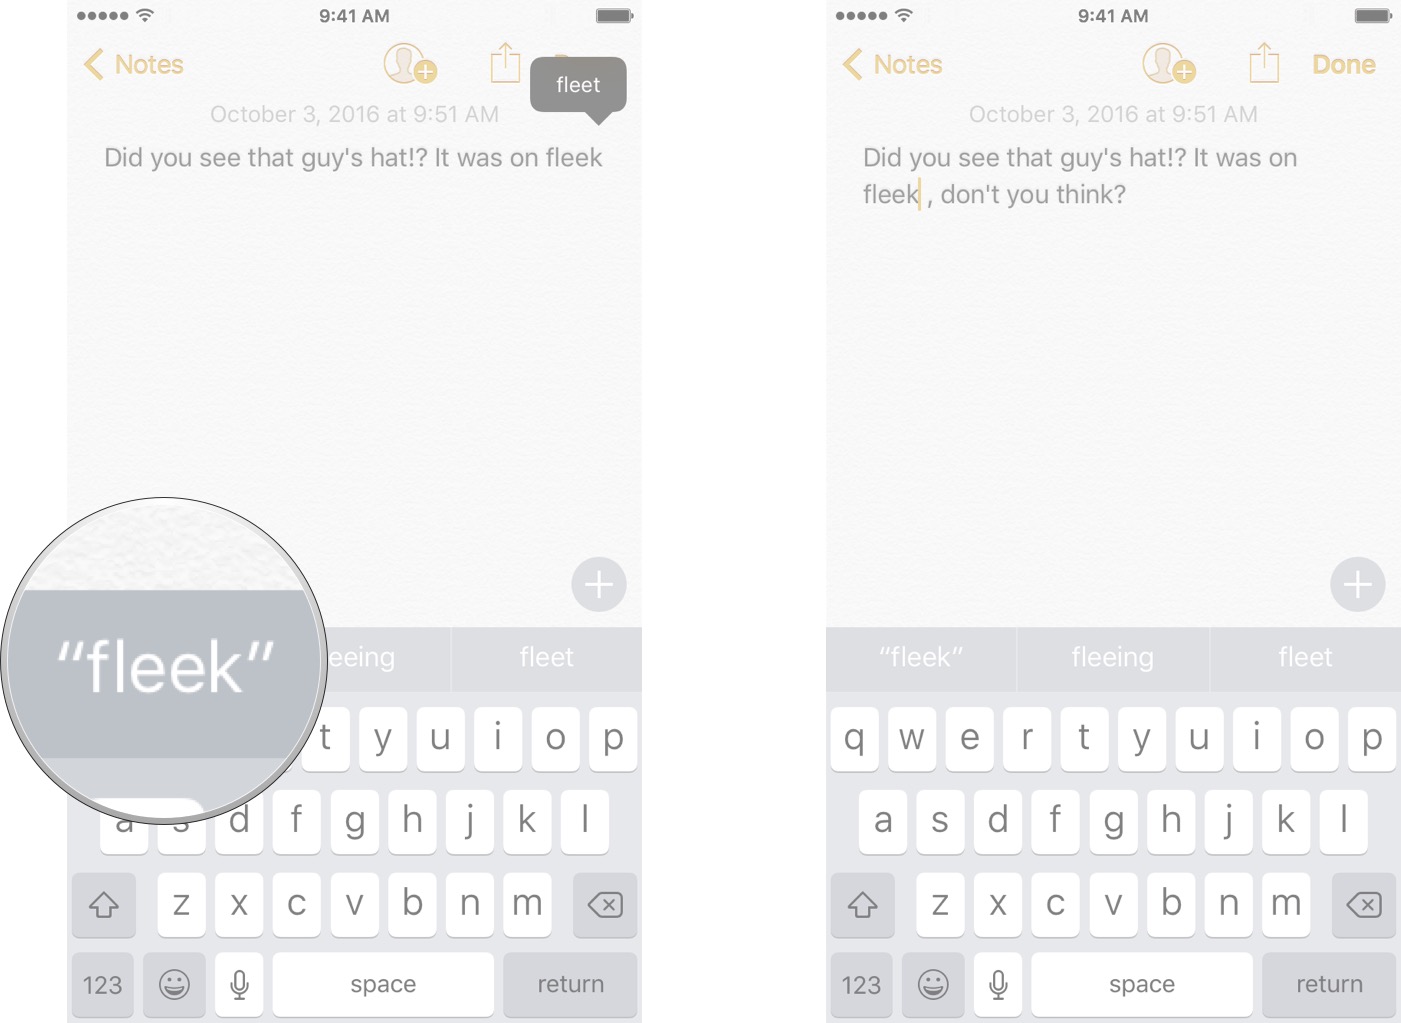
Predictive text uses deep learning to show you words that you are likely to use next in a sentence. It also suggests correct spelling of words, even slang words that you don't want to be corrected. Here's how to override auto-correct when Predictive Text is enabled.
- Start typing words.
- As you spell something wrong, auto-correct will suggest a couple of words in the Predictive Text section above the keyboard.
- Tap on the spelling you want to use in Predictive Text.
- Keep on typing.
Important note: The auto-correct feature will actually learn from you if you stop it from correcting you a couple times on the same word. So if you use a slang word often it should only take a few times of telling auto-correct to leave it alone before it will stop correcting that word for you.
How to turn off the auto-correct on iPhone and iPad
Auto-Correct is infamous for being really not helpful if you aren't paying close attention. If your fingers move faster than your brain sometimes the auto-correct feature may change way too much. And, instead of having just a few spelling mistakes on your screen, you have a whole new sentence - or even paragraph - that doesn't make a lick of sense. If it's getting too annoying for you, you can simply just turn it off.
- Launch the Settings app from your Home screen.
- Tap on General.
- Tap on Keyboard.

- Tap on the on/off switch next to Auto-Correction.

Now that ruthless spelling robot is deactivated. You can turn it on again anytime by just repeating the above steps.
How to turn off the auto-capitalization on iPhone and iPad
- Launch the Settings app from your Home screen.
- Tap on General.
- Tap on Keyboard.
- Tap on the on/off switch next to Auto-Capitalization.

How to cut, copy and paste text on the iPhone and iPad
Cut
Just like on any computer you can cut text you don't want. Whether it's a word or a whole paragraph it's easy to say goodbye to anything you have typed in the blink of an eye.
- Select the text you want to cut.
- Tap the Cut button from the menu bar that just appeared.
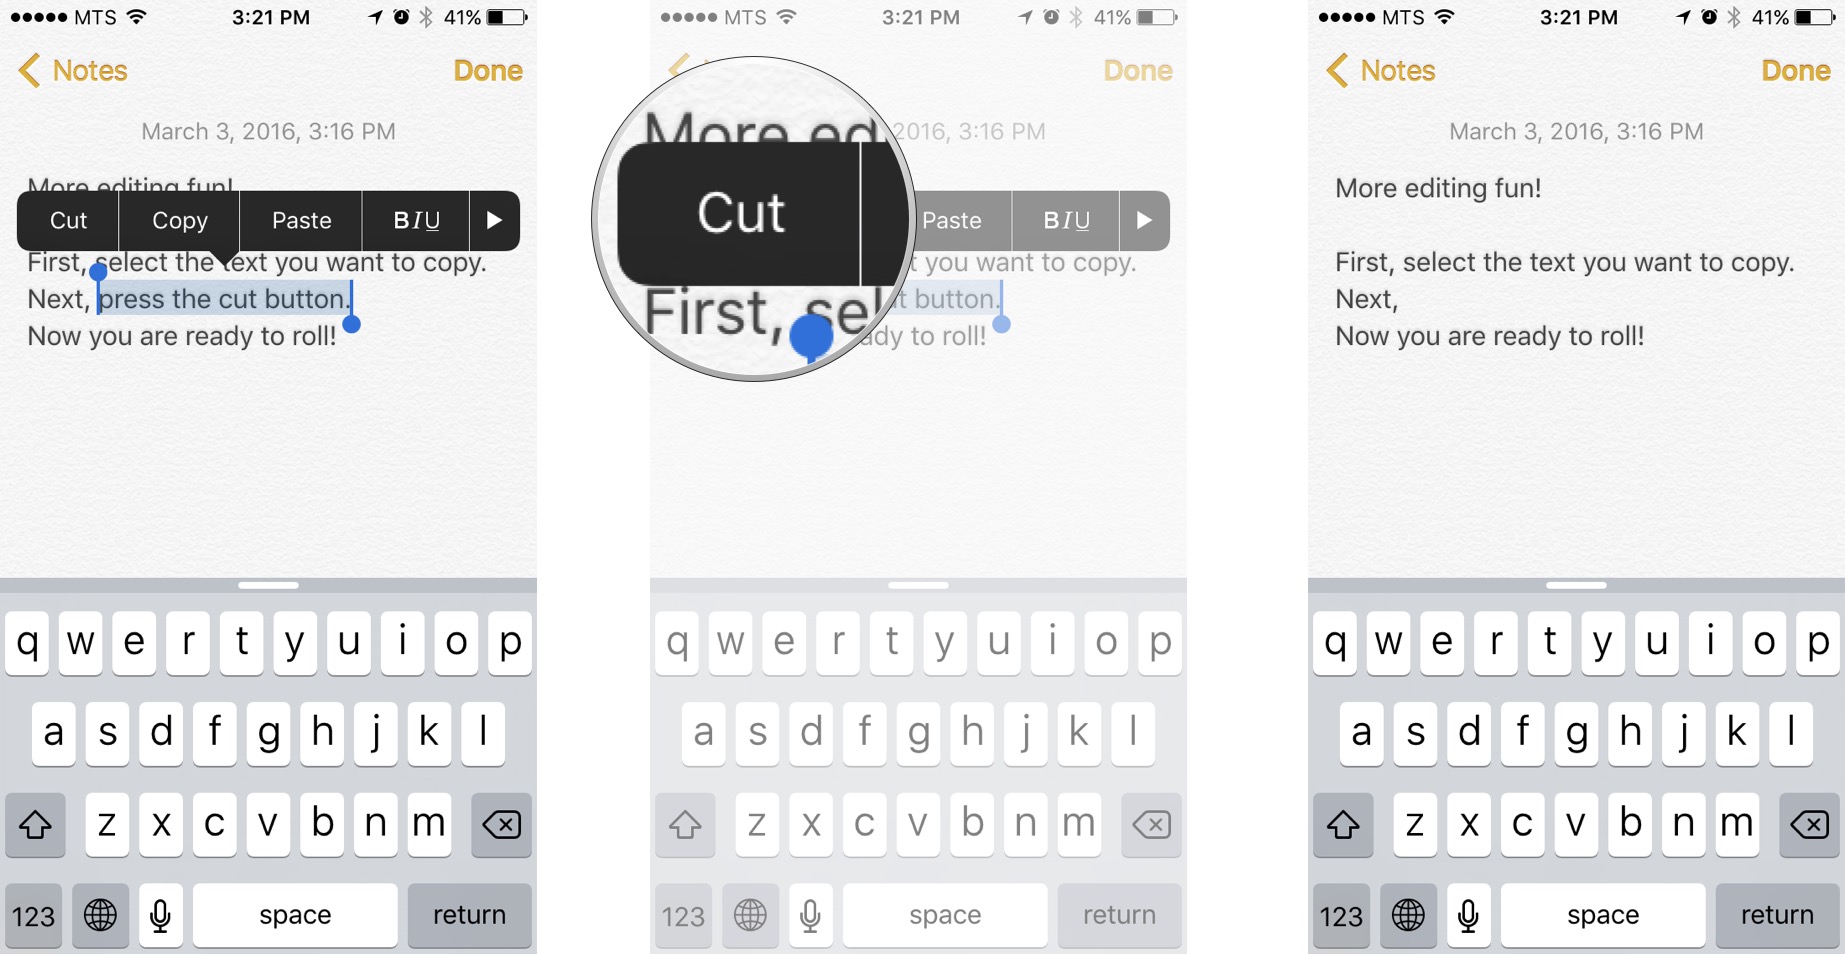
Whenever you cut text, it will save to the clipboard. This means you can then Paste it anywhere. You can only have one thing saved to your clipboard at a time, so make sure you know what you are doing before you go in fingers blazing.
Copy
Copying text will also save it to your clipboard so you can then paste it anywhere.
- Select the text you want to copy.
- Tap the Copy button from the menu bar that just appeared.

Now that text is saved to your clipboard. You can paste it in any text field you want. It doesn't even have to be in the same app. You can only one item saved to your clipboard at any given time, so make sure you copy and then paste before you copy again.
Paste
In order to paste something, you need to have something saved to your clipboard. Which means, you need to have text already cut or copied.
- Tap and hold the screen where you want to paste.
- Wait for the magnifying bubble to appear.
- Let go of the screen.
- Tap on the Paste button.
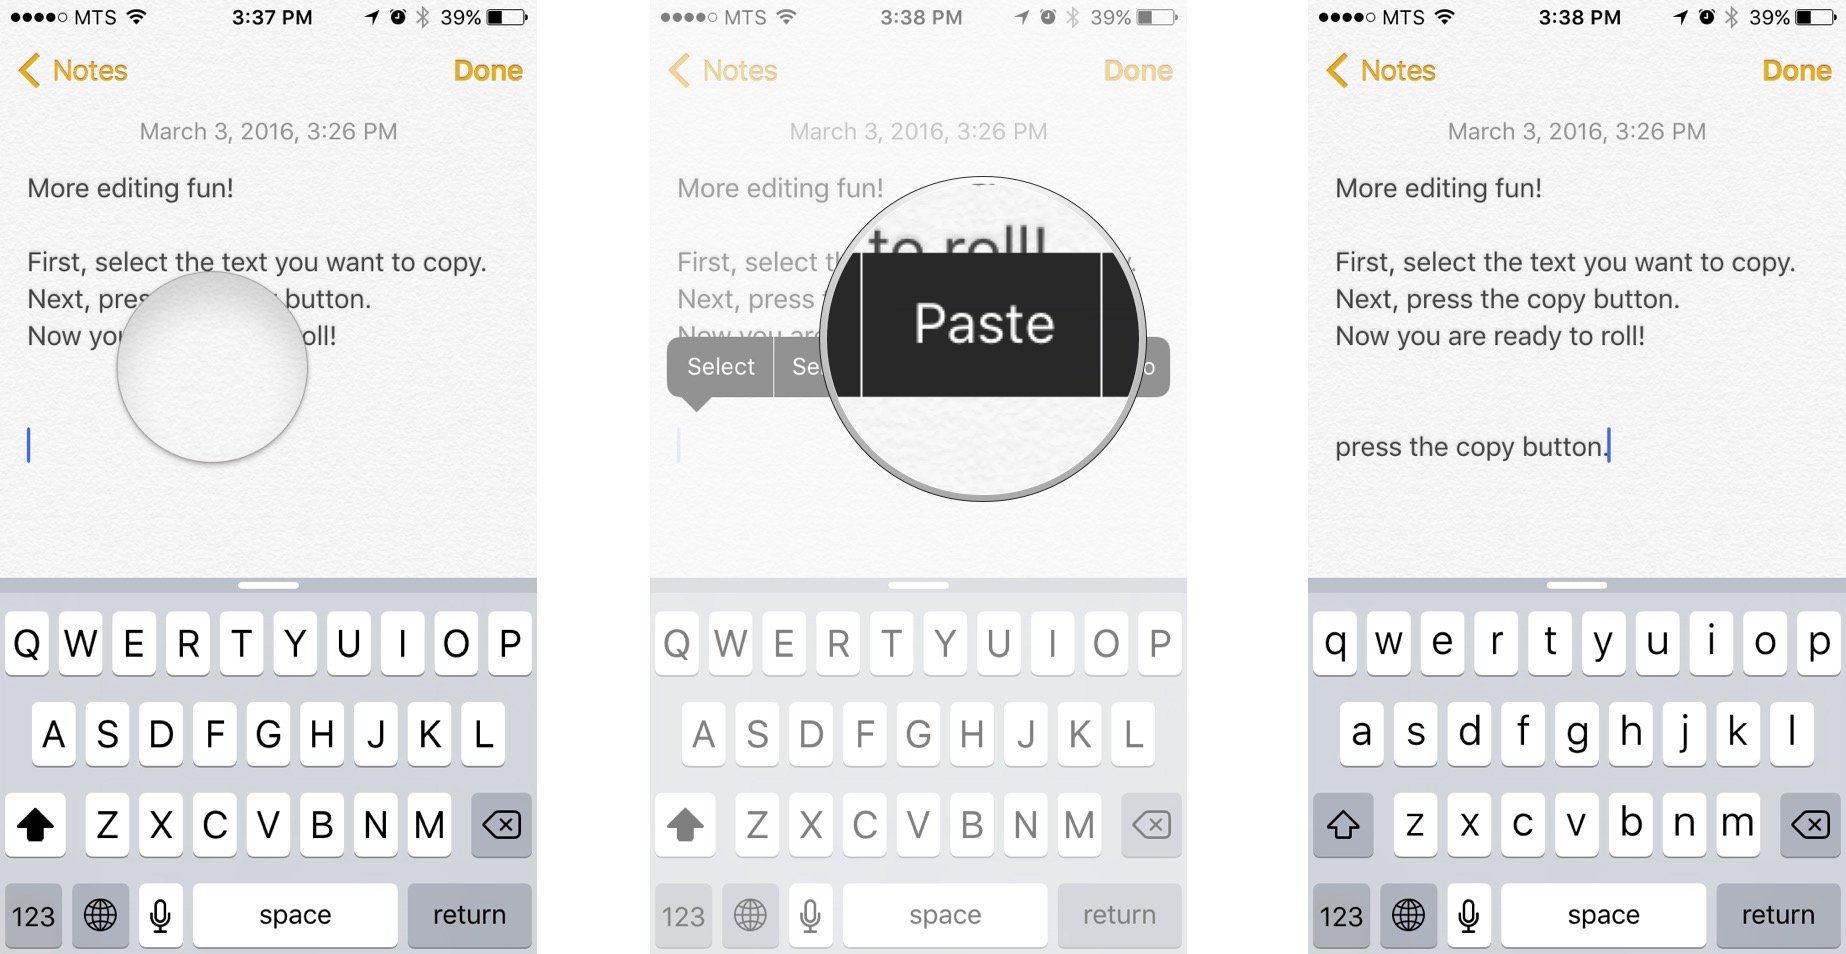
Whatever you have on your clipboard will now appear where you want it to.
How to bold, underline, and italic text on iPhone and iPad
Whether it's using italics for emphasis, or bolded text for clarity, formatting text can add a spice to your words!
- Select the text you want to be bold.
- Tap the arrow on the menu bar.
- Tap on the BIU button.
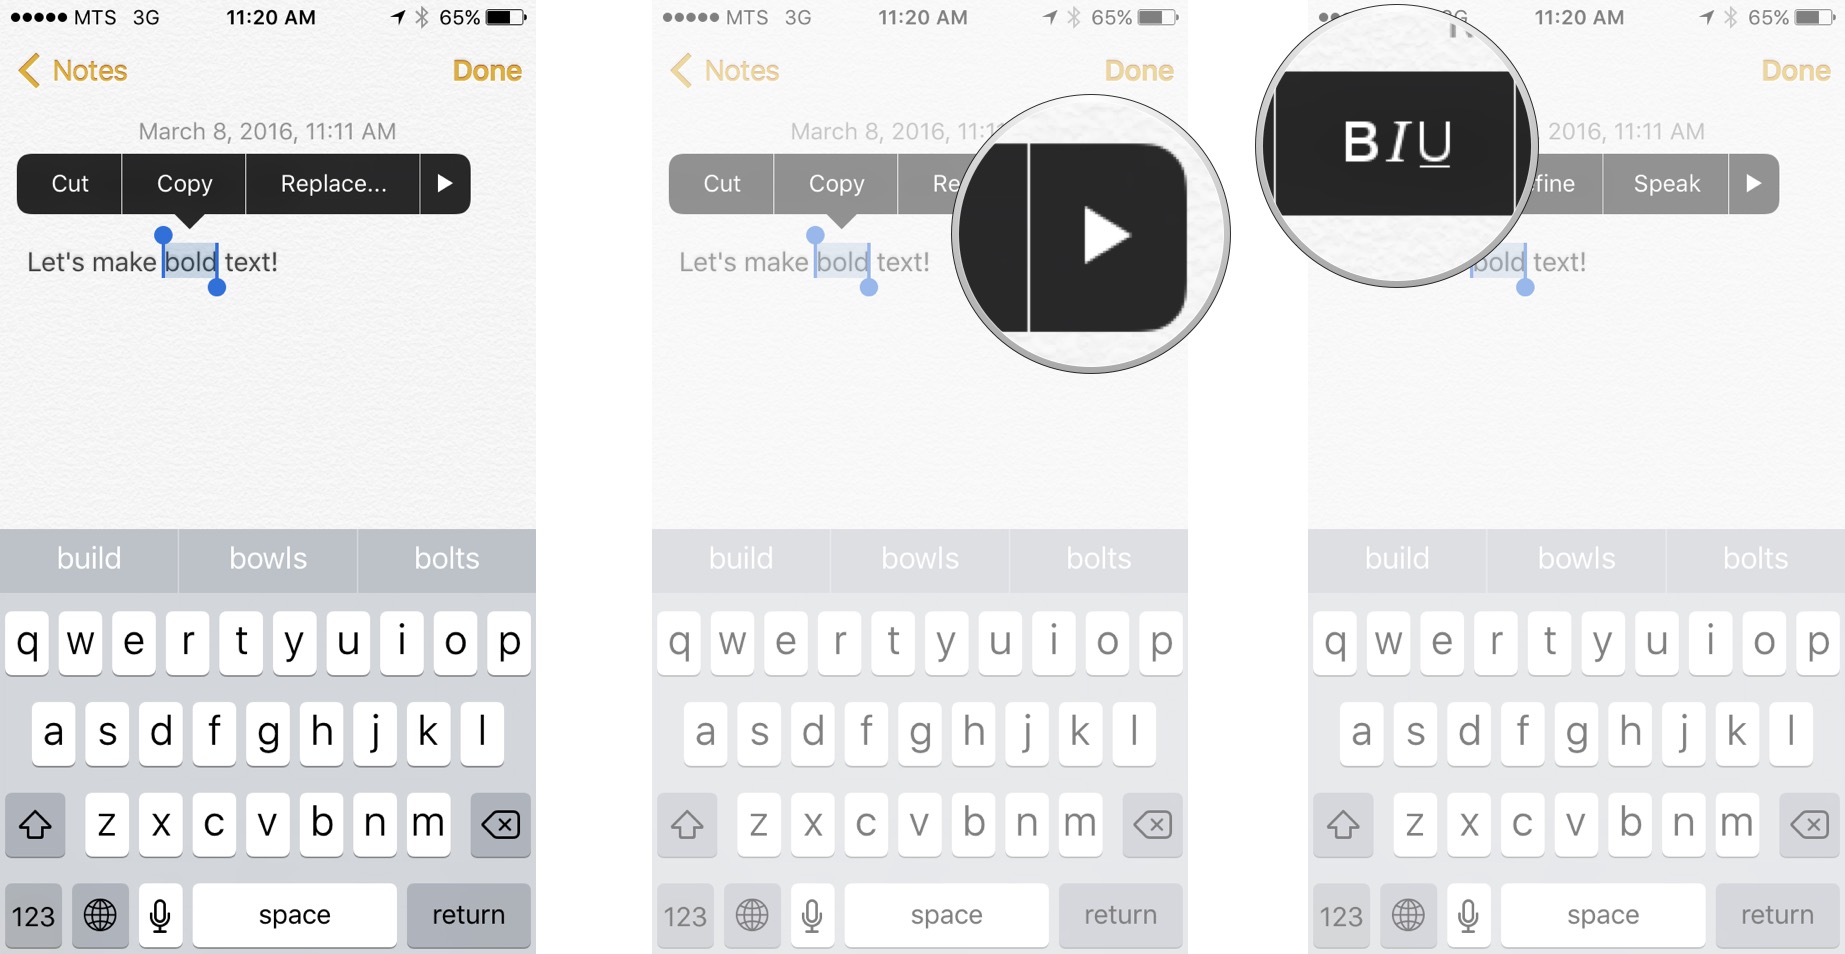
- Tap on the Bold button.

Italics is just as easy:
- Select the text you want to be Italics.
- Tap the arrow on the menu bar.
- Tap on the BIU button.
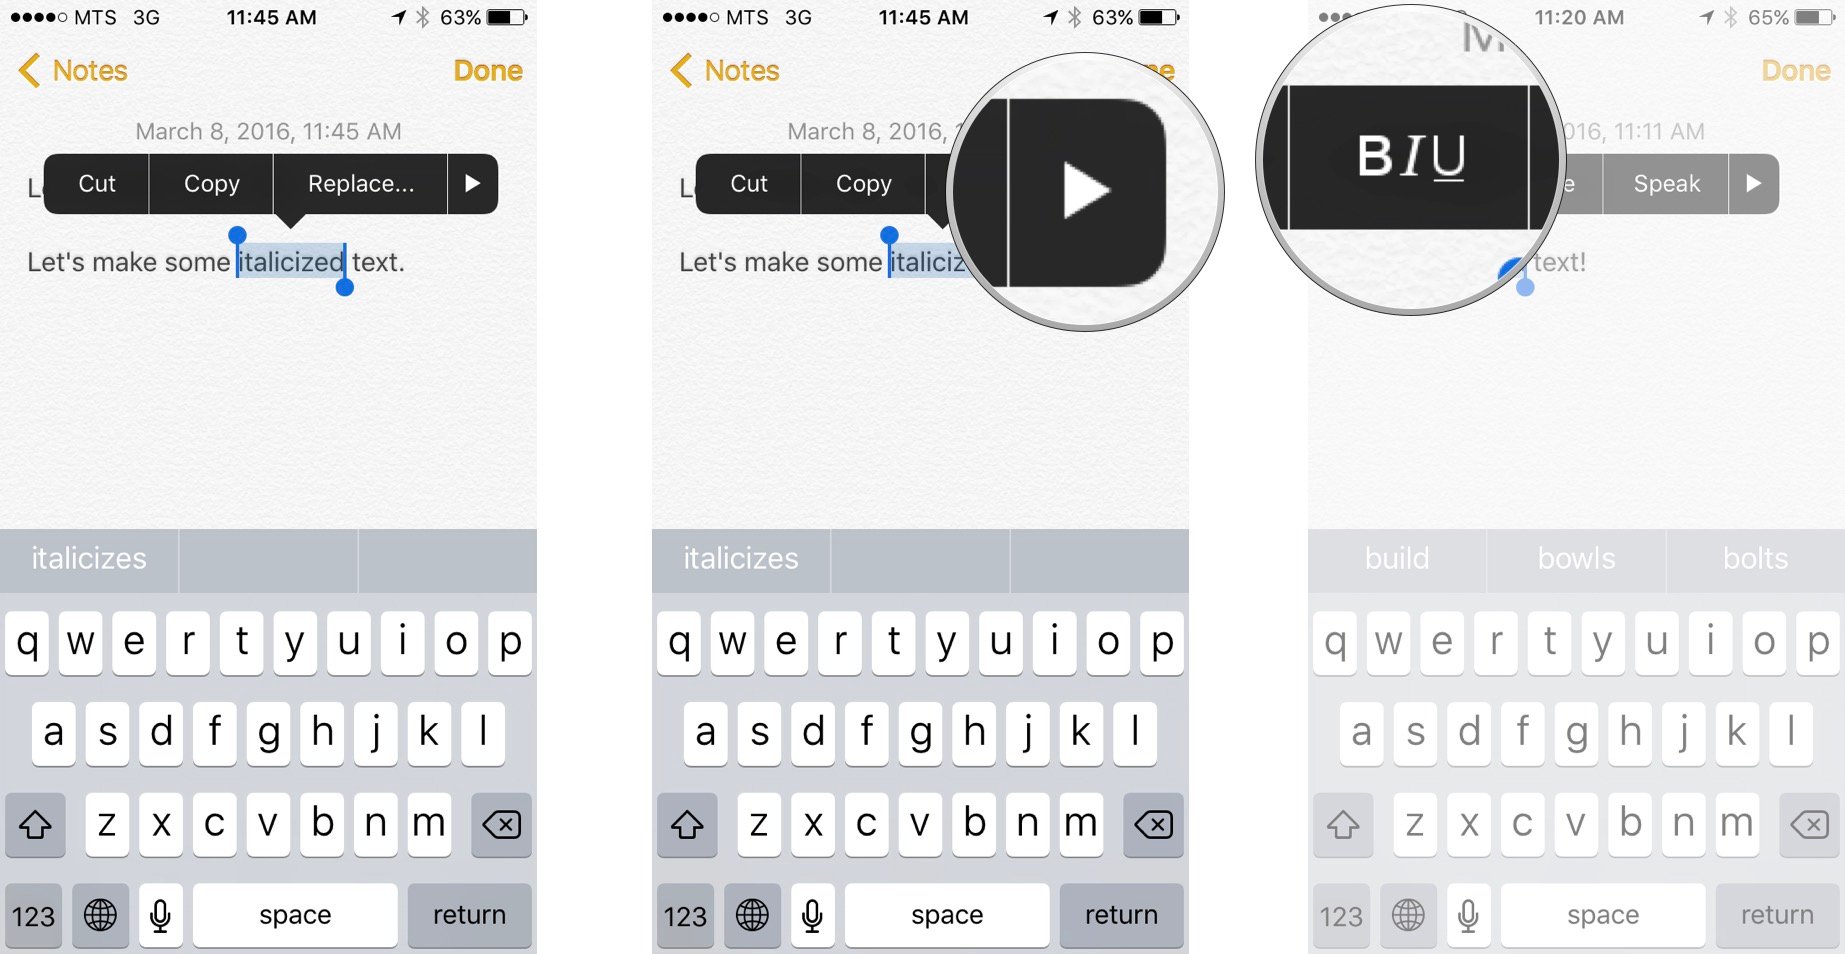
- Tap on the Italic button.

So is underline:
- Select the text you want to be underline.
- Tap the arrow on the menu bar.
- Tap on the BIU button.
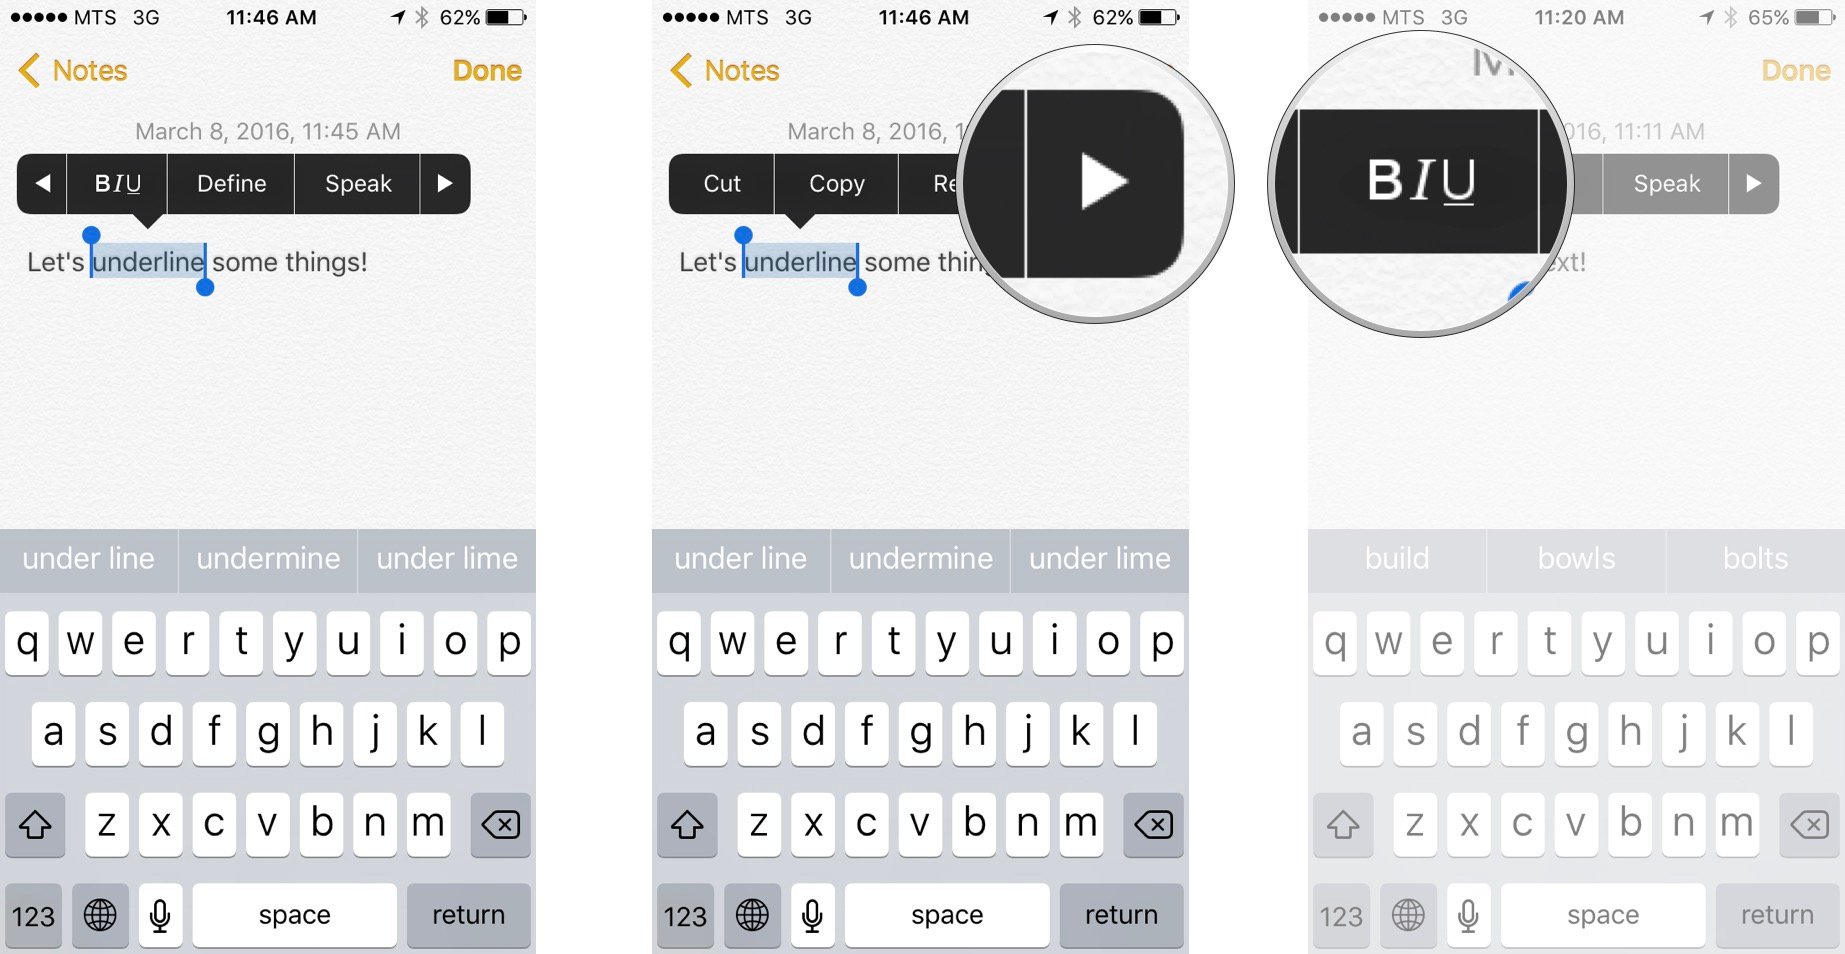
- Tap on the Underline button.

Related Post: How To Change FaceBook Name In Stylish Font
Comments
Post a Comment